IMAGES IN A DESIGN--Editing Images
After you have placed an image inside a frame in your design, you can determine what portion of the image is to be displayed. This function is available through the Edit In Frame command.
Editing an image in a frame can be initiated by doing one of the following:
- Highlighting the frame and selecting Edit in Image Frame from the Tools menu.
- Clicking the right mouse button when the pointer is over the highlighted frame and selecting Edit in Image Frame from the pop-up menu.
- Double-clicking on the image frame.
An Image Edit box is displayed on the right-hand side of the window.
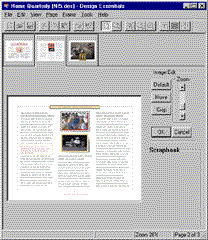
Default button:
If you press the Default button, the image returns to its default size and shape.
Move button:
If you have cropped an image to reduce the displayed portion of the image, you can use the Move button to reposition the image within the display frame. The mouse pointer changes to a hand when it is over the image frame. When the hand is displayed, press the left mouse button and move the image. Release the mouse button when the image is in the desired position.
Crop button:
Use the cropping function to define the area of an image that you wish to display. Press the Crop button then use the left mouse button to draw a bounding box around the portion of the image to be retained. When you release the mouse button, the cropped portion of the image is enlarged to fit the image frame. Use the Move button to reposition the image if necessary.
